
![Seikonaut Bracelet 20/16mm [TITANIUM] - - - - Lucius Atelier - Swiss Quality Seiko Watch Mod Parts](http://luciusatelier.com/cdn/shop/files/Seikonaut-Bracelet-2016mm-TITANIUM-Lucius-Atelier-Swiss-Quality-Seiko-Watch-Mod-Parts-7_1600x.jpg?v=1745004195)
![Seikonaut Bracelet 20/16mm [TITANIUM] - - - - Lucius Atelier - Swiss Quality Seiko Watch Mod Parts](http://luciusatelier.com/cdn/shop/files/Seikonaut-Bracelet-2016mm-TITANIUM-Lucius-Atelier-Swiss-Quality-Seiko-Watch-Mod-Parts-7_2000x.jpg?v=1745004195)
The SARB033 — and its white-dialled twin, the SARB035 — occupies a strange place in Seiko modding. It is one of the most loved Seikos of its generation, discontinued since 2019 and trading secondhand above its original retail, and it is also one of the hardest common Seikos to modify. The dial opening is large, the native dial size is non-standard, and nothing inside the case is held by friction alone.
This guide covers what actually makes the SARB different, then the full dial-swap sequence — including the chapter-ring transfer that lets a standard 28.5mm dial live in a case built for 30.2mm. Photos and video are courtesy of Darak from Darak Watches , whose demonstration of this modification remains the reference.
Difficulty: 5 / 5 — the hard part is transferring the bonded chapter ring without damaging it
Quick Answer: A SARB033 dial swap means removing two case screws, two movement clips and a steel holder ring, unscrewing the dial from the movement, then transferring the SARB's factory-bonded chapter ring onto a standard 28.5mm dial with acetone and removable adhesive. It is the deep end of Seiko modding — and the original dial does not survive the process.


What Makes the SARB Different
Most Seiko mods are learned on what we will call the commonly modded Seikos — the SKX, SNK, SNZF, SNZH, SRPD and their relatives — where the movement holds in the case by friction and the dial holds to the movement by two small feet. The SARB, running Seiko's 6R15, is assembled like a piece of proper watchmaking: screws, clips and retaining rings at every interface. Every one of those is a step the SKX modder has never met.
| SARB033 / 035 | Commonly modded Seikos1 | |
|---|---|---|
| Dial diameter | 30.2mm | 28.5mm |
| Movement-to-case fit | Screws, clips and steel holder ring | Friction |
| Dial-to-movement fit | Screws, retaining ring and dial feet | Dial feet only |
| Dial holding ring | ||
| Movement clips | ||
| Movement holder ring | Stainless steel | Plastic |
| Screws | ||
| Ease of dial change | Difficult | Straightforward |
1The commonly modded Seikos include the SKX, SNK, SNKK, SNKL, SNZF, SNZH and SRPD families, among others.
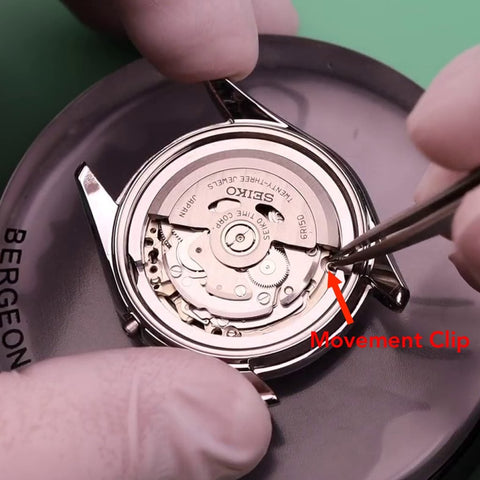
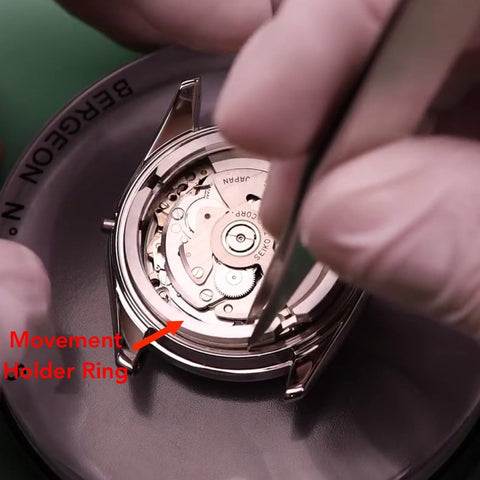
Step 1: Getting the Movement Out
On a commonly modded Seiko, the movement pops out of the case the moment the crown and stem are pulled. On the SARB, two screws and two movement clips secure a stainless steel movement holder ring over the movement. Remove the screws, lift the clips, take out the holder ring — and only then does the movement come free.

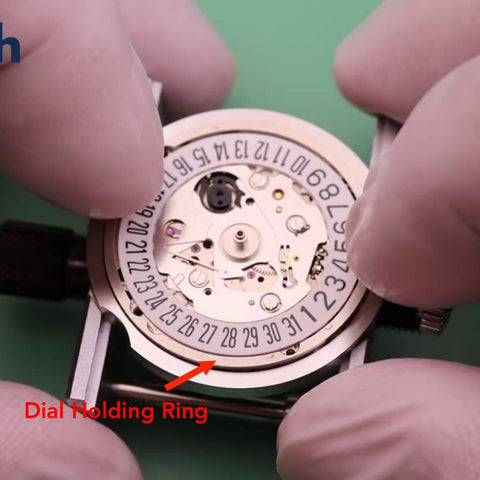
Step 2: Freeing the Dial
With the movement out, reinsert the crown and stem, align the hands together and remove them — the standard technique from our dial and hands tutorial . Then flip the movement: two more screws hold the dial, and once they are out, a dial holding ring sits on the dial itself. Lift it away and keep it — everything in this watch is a retained part.


Step 3: The Chapter-Ring Transfer
Here is the SARB's central problem: its native dial is 30.2mm across, while the entire aftermarket runs on the 28.5mm standard. The bridge between those two numbers is the chapter ring bonded to the face of the original SARB dial — black with white markers on the SARB033, pale cream with black markers on the SARB035. Transfer that ring onto a 28.5mm dial, and the new dial fills the SARB's large opening as if it were made for it.
Clip the legs off the original SARB dial, lay it flat, and run drops of acetone around its edge. Give the acetone 15 to 20 minutes to break down the factory adhesive. Then sit the dial face-down on something round — a crystal press die works — with the chapter ring overhanging, and push the ring's legs gently out with a toothpick. The ring comes away clean; the original dial, legless and stripped, does not survive the process. Accept that before you start.


Now mate the ring to the new dial. Clip any legs off the 28.5mm dial and the transferred ring — neither set is compatible here. Orient the ring on the dial face, then fix it from behind with small pieces of high-quality removable adhesive tape, 2–3mm wide, pressed down with tweezers at four or more points where dial and ring touch. Removable tape is the trick: it holds firmly and comes off cleanly if you ever reverse the build.


Tip: tape one spot first, flip the dial over and check the orientation against the movement before committing the remaining spots. Precision here is the whole face of the finished watch.
Step 4: Rebuilding the Stack
Reassembly is a sandwich, and double-sided adhesive tape is the mortar. Sit the movement holder ring on a movement holder, seat the movement into it with the crown inserted, and place four pieces of double-sided tape — roughly 1mm by 2mm — at opposing corners. Orient the dial holding ring and press it onto the tape. Add four more pieces on top of the ring, then use the crown to orient the movement, align the new dial, and press it firmly home. The tape sandwich holds the dial exactly where screws and feet once did.


Step 5: Hands, Casing and Closing
With the stack rebuilt, place the remaining four pieces of double-sided tape on the dial holding ring, use the crown to orient the movement, and press the new dial firmly home. Then comes the final hurdle every modder knows: setting the hands. They are as fragile here as on any Seiko, and the SARB's dial work will have been wasted by a bent minute hand — take it slowly, and lean on the hands tutorial if the technique is new to you.


The close is the sequence from Step 1 in reverse: flip the movement onto a gel cushion, remove the movement holder ring, case the dial and movement, refit the holder ring, screw the clips and screws back in, and close the caseback. Nothing about the closing is difficult — by this point, you have already done the hard part.
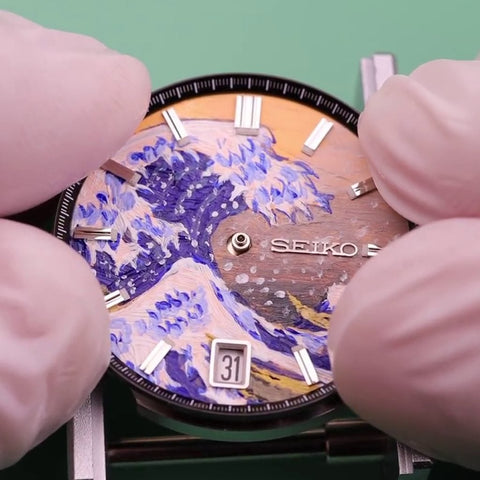
Watch the Full Process
Darak's build — an oil-painted Great Wave dial in a SARB033 — shows every step of this method in motion.
Modification generally voids a watch's factory warranty. External links are provided for reference — Lucius Atelier is not affiliated with, and does not guarantee, third-party content. Photos and video courtesy of Darak, Darak Watches.
Ready for the deep end?